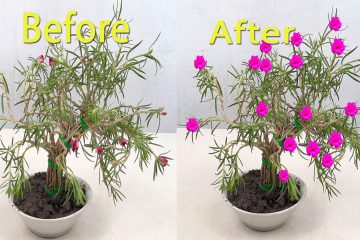


Best Time for Cuttings:
While you can try at any time, spring and fall generally offer the best results. Look for days when temperatures are between 70-80°F (21-27°C). Softwood cuttings (new, flexible growth) taken in late spring/early summer are often the easiest to root. Semi-hardwood cuttings (partially matured stems) in late summer/early fall also work well.
Materials You’ll Need:
- Sharp, clean pruners or a knife: Sterilize them with rubbing alcohol to prevent disease.
- Healthy rose stem: Choose one from a vigorous plant.
- Rooting hormone powder (optional but recommended): This significantly increases your success rate.
- Potting mix: A sterile 50/50 mix of perlite and potting soil, or a mix of equal parts coarse sand and perlite/vermiculite, works well for drainage.
- Pots or trays: Small pots with drainage holes are ideal.
- Clear cover: A plastic bag, clear tote, or even a cut-off plastic bottle (with the cap removed for ventilation) to create a mini-greenhouse effect and retain humidity.
- Water: To keep cuttings hydrated.
Steps to Grow Rose from Cutting:
- Prepare the Parent Plant: Water the parent rose plant thoroughly the day before you plan to take cuttings. This ensures the stem is well-hydrated.
- Take Your Cuttings:
- Choose a healthy stem from the current year’s growth, ideally one that has just finished flowering or is about to bloom.
- Aim for cuttings that are 4-8 inches long and about the thickness of a pencil.
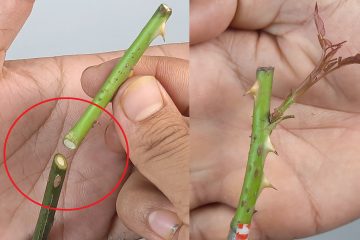
- Make the bottom cut at a 45-degree angle, about 1/4 inch below a leaf node (where a leaf or bud emerges).
- Make the top cut straight across, about 1/4 inch above a leaf node.
- Immediately place the cuttings in a container of water to prevent them from drying out.
- Prepare the Cuttings:
- Remove all flowers or flower buds from the cutting.
- Remove all leaves except for the top one or two sets. You can also reduce the size of the remaining leaves by cutting them in half to reduce moisture loss.
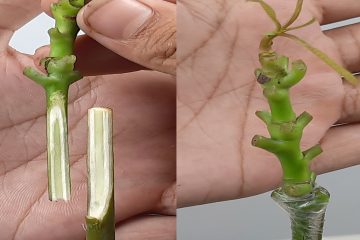
- Wound the base (optional but helpful): Gently scrape off a small strip of the green outer skin on the bottom inch of the cutting (avoid removing it all the way around). Or make two to four small vertical slices through the skin at the base. This encourages root growth.
- Apply rooting hormone (if using): Dip the bottom 1-2 inches of the cutting into the rooting hormone powder. Tap off any excess.
- Plant the Cuttings:
- Fill your pots or trays with the prepared potting mix. Water it thoroughly so it’s moist but not soggy.
- Using a pencil or stick, create a hole in the center of the potting mix that’s 3-4 inches deep.
- Carefully insert the treated end of the cutting into the hole, making sure at least two nodes are buried. Avoid brushing off the rooting hormone.
- Gently firm the soil around the cutting to ensure good contact.
- Create a Humid Environment:
- Place your clear cover (plastic bag, bottle, etc.) over the pot to create a mini-greenhouse. Ensure the cover doesn’t touch the leaves, as this can lead to fungal issues. If using a plastic bag, you can use a few small sticks to prop it up.
- Vent the plastic slightly to allow some airflow and prevent excessive condensation.
- Provide Care:
- Place the potted cuttings in a location with bright, indirect light. Avoid direct, harsh sunlight, which can scorch the delicate cuttings. A shaded windowsill or a covered porch is ideal.
- Keep the soil consistently moist but not waterlogged. You shouldn’t need to water frequently if the humidity cover is effective. Lift the cover briefly every few days to check moisture levels and air out the cuttings. Remove any fallen or browning leaves.
- Be patient! Rooting can take anywhere from a few weeks to several months. You’ll know it’s rooting when you see new leaf growth or when you gently tug on the cutting and feel resistance.